Wednesday, September 2, 2015

Pinteresting - Homemade Snickers

I have noticed that I really like pinning fun recipes on pinterest.  And yet, I don't make the recipes.  This is a great injustice for all.  Well, maybe just for me and my family.  But, no matter how small, injustices need...NEED...to be righted.    So....I sacrifice.
Each weekend, the plan is to have one of the kids pick a recipe they want to make, and then continue until I have made my way through my pinterest board.  This weekend it was homemade snickers.  

Here's the recipe I found from pinterest.

This was easy and fun to make.  Really.  No surprises, nothing crazy, just easy to make and yummy to eat.  The only weird thing (and isn't there always a weird thing with recipes?), who has an 11 x 7 inch pan?  I don't.  9 x 13  yes. 9 x 9, you betcha.  Maybe I'm out to lunch, but I didn't have this size of cookie sheet, pyrex, or anything else.  We made do with a 9 x 9 baking pan.  I think it wasn't perfect because the chocolate wasn't quite as thick as the one pictured on her web site.  But...that is nothing, no big deal, but thought I should share.  These were yummy, and you should probably do the world a favor and go make some for you and your neighbors.  They might need a little pick me up today!

INGREDIENTS
  • 1 cup semisweet chocolate chips 
  • 3 tablespoons creamy peanut butter
  • 7 ounces marshmallow fluff
  • 1/4 cup creamy peanut butter
  • 1 1/2 cups  Imperial Sugar Confectioners Powdered Sugar
  • 1 cup dry roasted unsalted peanuts
  • 11 ounces caramels
  • 1/4 cup heavy cream
  • 1 cup semisweet chocolate chips
  • 3 tablespoons creamy peanut butter
  • DIRECTIONS
    1. Line an 11X7-inch baking pan with parchment paper.
    2. Place 1 cup of chocolate chips and 3 tablespoons of peanut butter in a heatproof bowl. Microwave for 60 seconds and stir until smooth and combined. Microwave for few more seconds if needed.
    3. Pour melted chocolate in prepared pan and spread evenly. Place pan in freezer for 2-3 minutes or until hardened.
    4. Meanwhile, in a clean bowl place marshmallow fluff, 1/4 cup peanut butter and powdered sugar. With a wooden spoon or spatula stir until it forms a soft dough. (Can be done in a mixing bowl using dough hook as well).
    5. Remove “dough” from bowl and press with fingers on top of chocolate layer.
    6. Sprinkle peanuts on top, gently pressing them in.
    7. In a small saucepan add the caramels and heavy cream. Cook over medium heat, stirring constantly until melted. Immediately pour over peanuts, spreading it all over with the back on a spoon.
    8. Refrigerate for 5 minutes until set.
    9. In a heatproof bowl, melt remaining chocolate chips and peanut butter. Pour over caramel layer, spreading evenly.
    10. Place pan in fridge for 10 minutes until chocolate is set.
    11. With a sharp knife, cut into bars.

Book Review - Fabric Play by Deanne Moore


What a fun book.  Searching through this book was such a pleasure.  I loved looking at all the different quilt patterns, and seeing not just one example of each quilt but two.  Two very different takes on the same quilting pattern.  I love this.  I love that this whole book has this purpose, to show quilters that you don't have to do the same thing the pattern did. That you don't even have to come close.  Make it different, make it your own.

(love this modern quilt)


I think I have learned the very most about quilting and color when I have pushed the envelope a little bit.  When I have played off the "expected" in a pattern, and in turn, made something that looked completely new.  Deanne is really trying to get quilters to get rid of expectations, to push themselves to think outside the box a little, and try something new.

All the designs in this book are perfect for a beginning quilter, or for a quilter who is ready to challenge themselves with color and fabric selection.  It's really a great way to becoming a quilter who understands how to use fabric and color to make the visual impact desired.

Check out some of her designs, and the differences.  Check out here and here to get more info on this fun book.


Thursday, August 20, 2015

My latest favorite APP-Our Groceries

Grocery Lists...they are a big deal at our home.  Maybe because we love to eat so much, I don't know, but food is always on our minds.  With our busy lives, sometimes I go shopping, but sometimes I have the man stop on his way home and pick up a couple things.  

Sometimes I remember I need a little something that is not ordinary, and then once I get to the Grocery Store, I can't remember anything I need.  Well, not anymore.  I found the best app.


Here's what is special about this app. 
You can share this app with everyone in your home, so all your lists are in one place, and can been seen by all.  IN REAL TIME.   So, let's say you and your spouse are both in Costco together, and you have decided to divide and conquer.  You can each have the same list, and check items off as you go.  As you check items off on your list, those same items will be crossed off on your partners list as well.  If you decide to add an item, their list will grow too. 

 It's really cool.
I mean if grocery shopping can be cool, this is cool.

 You can have different lists for different stores.   I'm sure you can see why this is needed.  I have a list for Costco, target, Sprouts, and Ikea.  

I just love this app.  Every time I run out of something in the kitchen, I quickly add it to my list, and then I don't have to try to remember it later. It's all happily stored in my phone, and I just pull it out when I am grocery shopping.  Give it a try.  It's free after all.

Have a SUPER day.


Saturday, August 15, 2015

On the wall....

I got them on the wall. Man, I have a testimony of command strips, they make putting up pictures a breeze, especially if you have a second set of hands to work with. 

Now that we have them up, our minds are working. They could have kids art or imagine prints for each holiday, for birthdays, Christmas, etc. 

What would you do with yours?


Friday, August 14, 2015

Pinterest....ing- Clip Boards


Getting our home to look the way I want it to is a work in progress.  It takes time and money, and if I had either one in abundance I think it might be done already.  But alas, I have constraints (like most people) on both.  

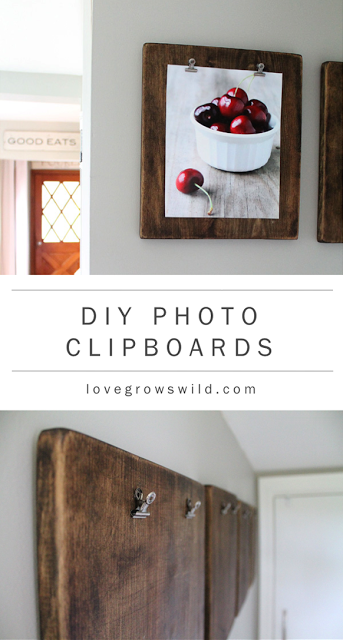
Pinterest is such a life saver, whenever I need some inspiration, I do a little search on pinterest, and my creative juices start to flow.    This time, I needed some inspiration for our game room upstairs...well the hallway around the game room.  Off I went to pinterest and found this:


Super Cute.  She used her clipboards for beautiful prints to match her kitchen, I'm thinking a little more playful, and maybe as time goes on, a place to display the art my kids create.


We cut the wood, sanded it, and I stained it with PolyShades...love that stuff.  It's a stain and poly in one.  I only did one coat, because well, I can't imagine it needs the protections of more coats, and I didn't want them any darker.


Attaching the hardware.  This was really difficult.  ha ha.. Just kidding.  Unlike the cute blogger before me, I did attach the clips with screws.  I can't help it.  The idea of glueing them made me imagine re-glueing them (kids are not known to be gentle), and I'm not into that.  

This is how it's done.  Measure where you want the clips ( I did 1 1/4" from the top, and 3 1/2" from each side).  Then using the screws pictured above, I put the screw through the back hole of the clip, and used my power drill (kinda sideways), and drilled it in as far as I could.  Then, I used my actual hands, and a manual screw driver, and turned the last few turns.  I had to use a skinny screw driver to fit through the top hole, but luckily we have every type of tool known to man (just kidding, my husband wants way more tools than we have).  

This is the finished product.  They are pretty cute.  I can't wait to get them up, and when I do, for sure I'll show you.  (And you can guarantee I'll put the up with command strips...those things rock).


Thursday, August 13, 2015

Perfect Quilts for Precut Fabrics-Book Review


I had such fun looking through this book.  Seriously, if you ever want to make a quilt from precuts, you should definitely check this book out.  Even if you are a purist, and like to design your own quilts, this is a great jumping off point.  

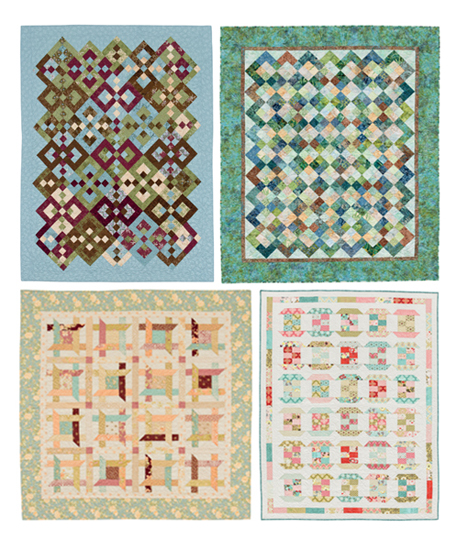
This book has a ton to offer.  I love that the sections are organized by the kind precut fabric.  If you're like me and you have some precuts sitting on your shelf, pick one of these quilts patterns, and turn that fabric into a magical quilt, your next masterpiece, or something for a loved one to snuggle in.

Check out some of the quilts below.  And get to work.

You can find more info about the book here and here.


Monday, August 10, 2015

Life Lessons...provided by Quilting

My most philosophical thinking happens in the shower.  Maybe that's because it's the only place I'm really alone.  Maybe it's the water.  Who knows.  But I like it.

This morning I was thinking about my family, my roles, and my goals.  I was also thinking about my role as "Support Staff."  I think as a younger person, I would have been less happy to be "support staff," but now that's my most comfortable role.  This brought on the idea of my fabric (because everything relates to Quilting), there are star fabrics, and there are support fabrics.  Each fabric is important to make a quilt beautiful, and to make it work.

Let's look at this photo below:


Each of these fabrics could be a "star fabric."  Yet together, they don't work.  They compete with each other, and they don't shine.  Fabrics, just like people, are all unique, with their own qualities. Some fabrics work well together, but clash with others.  This clashing doesn't lower the quality of either fabric, it just means these fabrics aren't meant to be joined.

Let's talk about this photo:


Here are two star fabrics and two supporting fabrics.  Notice, the blue star fabric looks best when it is paired with a fabric that complements it.  The colors are complementary, as well as the pattern, the geometric pattern doesn't compete with the floral.  They each can be beautiful, as they are, and they bring out the best in each other.  Now, notice the other pink star fabric.  It matches the blue star fabric, but does it truly complement it?  The colors are complementary, and these fabrics they don't hurt each other, but they also don't make each other shine.

People, like fabrics, work best with people that complement them.  People can get along with all types of people, but why not work closely with those that bring out your best?  The best quilts don't come from fabrics with colors that match perfectly, and with patterns that are all the same.  The best quilts have colors that complement, and patterns that support and don't compete.  Friendships are the same, the best friendships come when the people aren't exactly the same, and when our qualities bring out our friends best qualities. In friendships sometimes we are the star fabric, and sometimes we are the support fabric, but no matter what happens, we always need to complement each other.  Let's make each other shine.


Saturday, August 8, 2015

Teen Boys Room

As I was decorating Little dude's room, my teen was slightly upset I wasn't finishing his room.  I definitely had neglected that room, because well...he was a teenager.  I kinda thought he didn't care.  I was wrong.  He cared, well kinda.  He wanted a decorated room, he just didn't know how he wanted it decorated.  He wanted me to just take over and do it.  Okay.

Last summer, I finally painted the kids rooms.  Here's is what my teen's room ended up looking like.  Blue walls, with one accent Orange wall.

Before:

I'm a "make do" type of person.  Yes, having things perfect, would be "perfect."  But who can afford that?  This desk and bed definitely don't go together.  They barely, and I mean BARELY, fit along that wall.  But that is what I had to work with.  So, we put them in there together, even though the "design" element of it didn't really feel right.

Well.  After much thinking, I thought, let's give that desk to the one person in this house that doesn't really care what her room looks like, and who has A TON of stuff to store.  So, we traded desks (and yes, that process almost killed me), I don't think L desks are meant to be moved with an 11 year old and a 5 year old.  

The theme of my teens room was travel, or places of the world.  I knew his orange wall needed something...but what?  We discussed bike wheels lining his walls, maybe framed pictures of places around the world, maybe maps, planks of wood...etc..  But we came up with the idea of mimicking his bedspread a little bit (the white on orange part). I got a city skyline off of silhouette america's website, and cut the skyline out of white vinyl.  


Honestly...I Love it.  and you know what?  The kids loved peeling the vinyl to make it all happen.


A LONG time ago.  Like when I first moved into our new house, I saw an idea for this next part in a pottery barn catalog. I wanted my own take on it, but my man cut these planks from pallets months ago, and they have just been waiting for me to finish.   Using my Silhouette again, I cut locations, and distances in miles from our home.  The idea is...I'll go where you want me to go...I think a little vinyl may go above these signs someday soon.

Spray paint is the way to go here.  So so so so fast.  Cover all the wood as you spray though, or you might get some overspray.  But, some overspray looks kinda cool, if I say so myself.


Here's what it looks like in his room.


Here's his other wall, flag from our beloved Y, and map and frame from IKEA...total $20 for frame and print (both were $9.99)


This is the new desk center.  Man, this lightens up the room so much, in weight and actual light.  Shelves and brackets come from ikea...each unfinished pine shelf was $6.  Seriously, a great buy.  And that stainless steel shelf with books and frame?  That was $14.99.  Hot dog, that brought me joy as well.  Table and chair came from Crate and Barrel about 13 years ago.  So.....let's say it has been around awhile.


Here's the finished product.  I love that my teen LOVES this room.  He goes in now and just looks around, enjoying it.  That's reward itself.


Friday, August 7, 2015

Boys Room Decoration

Last summer I spent a few days and painted all the kids rooms.  But, then the decorating stopped.  We had vacations, and budget restrictions.  So...school happened, and then I didn't get to decorating again until well...now.

Here's my little boys room.  When we were picking out themes for rooms, the beach theme was not a "thing" at the time.  And my cute kiddo saw whale stuff, and he knew that's what he wanted.  Here's what we pulled together.

The whale wall.  
1.I saw something like this on pinterest.  I did my own take on it, but here's how I did it.  Painted the whole wall the light blue.  Let it dry overnight.  
2.  cut vinyl in that pattern you want.  
3.  Paint the next layer.

Yes...this takes some thought and planning.  Actual image vs outline of image, etc.... But, it's really quite easy.


Over The Bed

1.  Canvas prints, and a cute what cut out (target), starfish (Michaels), and a fun paddle (found at the thrift shop).  The paddle painting idea I found on pinterest.   I have to say.  I tried a few different methods, just kinda diving in.  The best method was spray painting.  Every other method seemed to have more flaws than perks.

 Window Wall
This was my favorite...because it took about 30 minutes.  Go to HomeGoods...and pick up a few clearance items.  $30 for both of these goodies.  Not too shabby.  Thanks.


And now, I'm finally done with this room.  What really surprised me,  as I was working on this cute boys room, my oldest boy asked me why I haven't decorated HIS room.  Sometimes I think teenagers (especially boys) don't really care.  But, they do.    His room is next......


Thursday, August 6, 2015

Back..in more ways than One

We're back.  In lots of ways.  We're back to school.  Back to work.  Back to routines.  Back from vacation. Back to blogging. We're back.

I'm a little sad about that. As summer started, I thought I might still have time to blog, to quilt, to work on things.  I even prepared ahead of time, I knew there would be times I couldn't post, so I scheduled blog posts, and then thought I could catch up later.  Later came, and guess what?  Kids were still needy.  Oh so needy.  But in the best ways.  They needed me to go swimming with them.  To make memories together. Guess what?  I did.  They are my number one.  And as time passes, I have realized that the saying "they grow up fast" (although annoying to hear when you have 3 under 4), is actually true.  I feel like I'm staring down the future, and the exodus of my little ones is fast approaching.  So, I took the summer off.  We had fun.  We played with friends, made lots of pizza, made lots of messes, snuggled, played Mario cart, and more.

But...even though its 107 degrees outside, somehow summer is over.  Now it is time to get back to work.  The kids are back to school, the late nights have ended, and I can finally wake before 7 am again.

I'm excited to share some of the things I have been working on.  Some are big projects, some are small, some are tips that might make your day easier, and some are just my ramblings (you can thank me later).  

We're back!!!!


Thursday, July 9, 2015

Creative Eye Thursday-Learn to Quilt as You Go by Gudrun Erla

Martingale, 2015; used by permission. Photos by Brent Kane. All rights reserved
I had heard of quilt as you go, using a serger, but I hadn't seen it done this way.  This book goes into great detail on how to make quilts...as you go.  I love how she showed how to make the illusions of curved piecing.    

There have been many times that we, as quilters, and homemakers, friends, and sisters, have wanted to make a quilt in a hurry,  to show the deep love, concern, and caring we have for someone.  I know there are times I have mourned a little because I didn't have the time to make something special for a loved one.  
Martingale, 2015; used by permission. Photos by Brent Kane. All rights reserved

Now, with this method, I could whip something up, quite honestly, in a day.  I love that.  I love that the hardest part for me, the quilting, is done at the same time as my favorite part, the piecing.  You should definitely pick up this book, enjoy it, and then be able to quilt quickly when you have a need. Check out Martingale to buy the book.

Martingale, 2015; used by permission. Photos by Brent Kane. All rights reserved

 Martingale, 2015; used by permission. Photos by Brent Kane. All rights reserved

Martingale, 2015; used by permission. Photos by Brent Kane. All rights reserved


Thursday, July 2, 2015

Creative Eye Thursday- Handmade Christmas Cheer by Pat Wys

Martingale, 2015; used by permission. Photos by Brent Kane. All rights reserved
Christmas In July!  

Now is the perfect time to start those Christmas projects you want to give to loved ones, or the ones you want to display in your home.  Strange as it seems to have christmas projects following you on family vacations, and sitting on your lap as you watch "So You Think You Can Dance." it is actually the perfect thing to do in the summer.  Now is the time to sit back, relax a little, and take some time to make something perfect, for those we love so much.  It's also the perfect time to perfect a skill you need to improve.
Martingale, 2015; used by permission. Photos by Brent Kane. All rights reserved


In comes the book Handmade Christmas Cheer.... You will love all the fun projects she has for you.  Big ones, small ones, projects for beloved family members, and little gifts for coworkers and neighbors.  She makes simple projects, into amazing gifts by spending a little extra time on the hand stitching.  There are ample instructions on how to do each stitch, and how to make a project you will love.
Martingale, 2015; used by permission. Photos by Brent Kane. All rights reserved

Check out the book, you will love it.  Go here or here to buy the book, and get ready for a fun Christmas (in just a few short months).
Martingale, 2015; used by permission. Photos by Brent Kane. All rights reserved

 Martingale, 2015; used by permission. Photos by Brent Kane. All rights reserved

 Martingale, 2015; used by permission. Photos by Brent Kane. All rights reserved

 Martingale, 2015; used by permission. Photos by Brent Kane. All rights reserved

Martingale, 2015; used by permission. Photos by Brent Kane. All rights reserved