Friday, April 25, 2014

Birthday Celebration Little Girl Aprons

Birthday plans are sprouting at our house.  I have a little one turning 10, and since we have a friend party every EVEN birthday, it's her time to celebrate.  After 2 weeks of her pondering what to do for her party, we finally decided on a party at home decorating cupcakes.  For the past few years I have been encouraging my children to have their parties at other establishments...you know, a tea party at a restaurant, pizza party at Peter Piper Pizza's,  pool parties, etc...  In the past I have gone a little too crazy for birthday parties, and having the parties at other locations helps me from making homemade backpacks, and other goodies.

Well, this party is at home, which means I might be getting a little crazy.  As I was thinking about how to make this party special, I thought each little girl should have their own apron to decorate cupcakes.  We are on a bit of a budget, so I just raided my giant stash of fabric to make these little aprons.

Here's how I made my aprons.  To be completely honest, I think mine are a tad small. They don't really look small on my cute little girl, but in a year or two it might be.  So, you may want to change the measurements to fit your needs.

The bottom measures 15" and the top measures 7".  I made it these measurements to get the most out of the fabric we had.  So, ponder your needs and adjust accordingly.

As far as the trim, I had this cute fun mini pom pom trim.  I used it just like ribbon, and I found it was much softer than the ribbon I had, so it would be more comfortable around the neck.  Yep, just using what we have is the name of the game.


This picture shows how I measured the fabric.  I marked the cutting mat because the marking on the fabric was too hard to see.  

I debated what to do next....a  rolled hem, or just line the apron with ribbon, or put a binding around the whole thing.  

I decided on the rolled hem (gotta love that awesome presser foot, it does everything for you). I decided on this because I thought it would make the apron more durable and less likely to fray. 


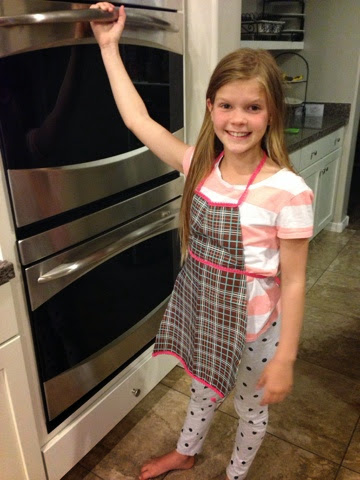
Here's the finished product.  It's pretty darn cute.  (Don't mind that quilt I'm working on at the same time.  Piles of blocks waiting to come together.   I'm doing what I can, one moment at a time.)


Tuesday, April 15, 2014

Chevron Table Topper


I wanted to make my very own take on the chevron quilt with the latest chevron craze.  Because this is a totally different method for making chevron quilts, I wanted to start out with a small quilt.  Now I have a very nice and pretty table topper for my home.  The nice thing about this table topper is that it works for any time of year; Spring, Summer, Fall, or Winter.  Pulling out the colors for the season, and decorating with those.  

I really had fun making this little gem, and I thought I'd pass on the fun to you.  Below is the method of how I made it.    Have Fun!!!


Materials

30 Charm pack squares (5" squares)
1/2 yard white 
1/3 yard binding fabric


Cutting Instructions
Making the Chevrons
1.  Cut each  5 " square in half.
2.  With right sides facing each other, cut the corners off the charm strip, at a 45 degree angle. (24 chevrons for quilt middle, remaining six fabrics for border strips)


3. Cut 11 strips 2 1/2" strips of white fabric, for the top and bottoms of the chevrons and for the borders
For 9 strips, cut shape pictured.  Using the 45 degree angle on the ruler, cut the diagonal, and cut the straight line, 2 1/2" from the shortest point.  Cut  36 of these white shapes.

Save the other two strips for the borders.

4. Cut 2, 2 1/2" strips for between the chevron blocks
Cut the end of the strip at a 45 degree angle.  From that edge, cut 1" strips

5.Cut 3, 1" strips for the chevron blocks 

6.Cut 1, 2 1/2" square

Sewing:

1. Organize the chevrons in a visually pleasing pattern.  Then sew the corresponding white strips to the colored parallelograms.

For each top and bottom chevrons, sew the trapezoid white strips.  Press toward the colored fabric.  

For each middle chevron, sew the 1" white strips to each long side of the parallelogram.  Press towards the colored fabric.


2.  Sew the left side of the chevron strip together, and press.  Sew the right side of the chevron strip together, and press.


3.  Making sure to match the points of each chevron, sew the matching chevron strips to each other, and press.  Continue with each chevron strip.

Making the Chevron blocks

1.  The chevron strips might be different lengths.  Trim each to 11 1/2".
2.  Sew a 1" white strip to both sides of the outside chevron strip.  Press towards the chevron strip.  Sew the other chevron strip to the outside chevron strip, (making sure the chevrons are going the same direction).  And press.  Trim edges to make even.
3.  Repeat for all chevron blocks.

Sewing the Quilt Top together

1.  Sew chevron blocks together, using the white 2 1/2" square in the middle of the quilt.  Use the inset seam method to piece the blocks together.


Border Strips

1. Piece the Border strips together in the same manner as the chevron strips.  However, piece only one side of the chevron strip together, and for the bottom white trapezoid use 2 1/2" strip cut on the 45 degree angle.

2.  Sew border strips to the quilt top, taking care to line up the chevron lines together.

Quilt
1.  Quilt and bind as desired.


Thursday, April 10, 2014

Our Little Office Workstation


Wait?  You're thinking, that's not an office or a workstation.  That's a kitchen.

Okay, so yes.  When we were building this house,  I knew we wanted a workstation in the kitchen.  In our old house we had a computer in the kitchen, and it changed my world.  The office we had loved before became obsolete, and all our needs were being taken care of in our kitchen.  The only problem was in our new house the little nook where this "office" would be was WAY bigger.  Like three times bigger.  That tiny desk we bought to fit in our old kitchen, would definitely look super out of place in our new one.

So, I got thinking.  And I became very close friends with the internet.  I was browsing on ikea, and I saw a little workstation.  That started my wheels turning.  We could make a workstation there.  It could be more than one desk. Maybe two people could sit there.  So we measured, we thought, and then I got crazy.  I realized there could be three workstation spots.  Are you kidding me?  All my school age kids could have a spot.  Weird.  Wonderful.  Wow.

I knew I wanted to use the ALEX drawers as the base of our desk.  In all honesty, these are good, but if I had my preference I would get something with little drawers and some hanging files.  I miss that a bit. But, the prices of the ALEX couldn't be beat.  And if you know me at all, you'll know that price is a big deal to me.  So, now for the top.

This was hard.  I tried to find anything that could be a countertop for a good price.  I found butcher block counters...a great price too.  Except, darn it, the shipping was as much as the counter.  NOPE.  granite?  I needed 12 ft.  Yes  12.  That's a little crazy, and a little expensive.  That also meant that prefab anything was out.  I found a solution of using 2 x 12's.  After looking through many of those, we realized that none were straight enough.

Finally, we came to the conclusion we could use plywood.  You know, "fancy" ply.  We used maple, cut the length in half so it was 24" wide.  For the 2 side pieces we used the remaining wood, we turned it so the grain was going the opposite direction (to give it interest, and make it look intentional), and cut those pieces to give us the length we needed, and of course kept the width at 24".  Using a friends biscuit joiner, we joined the pieces, and then added some finish wood around the 3 edges that would be seen.  The back was going up against the wall, I felt adding the finish wood there was overkill.

****Funny side not my husband will love for everyone to know.  He didn't calculate correctly, and the desk was 1/4" to big to fit in the space. Luckily, he knows how to use his tools.  He cut off a little stained it again, and it is perfect.

Next we stained it.  The color of our kitchen is kinda a gray/brown color, and white cabinets.  So, I stained this with all gray stain.  And then lightly stained it with brown over top.  It turned out just like I wanted it to.  We used a water based poly, and can I say, I won't ever do that again.  Yes, it washed out like a dream, but it totally created bubbles that is not what I wanted.  But, that's what these projects are about....learning.. right?  Well, that's what I think.


And here's the finished product.  Three workstations.  All the computers in our house in one location.  A space to work without a computer, and 2 other spaces with computers to get those papers done, and all that other stuff kids need to do. 

 I honestly love this.  Someday I might even decorate it to make it look "cute."


Friday, April 4, 2014

What Does Milk and Honey mean to me?

milk and honey?  Why is that the name of my blog?  How does it represent what I am trying to do in my life?

Milk and honey represent to me how I am to balance my life.  Milk and cream are rich, life giving resources, to me, milk represents the needful things of life..  Honey is sweet and pure, and represents the spice and sweet things in live, "the shining moments of joy" we all strive for.

Most of life is filled with the milk.  Milk is pretty great, we need it, and sometimes it is exactly what we want.  But, there are other times we need a little something more.  We need something sweet, something that makes us feel special.  This is the honey of life.  And for me, I like it when I can have a little of both in all I do.

So, in each day I try to balance the milk and the honey of life.   In each quilt I balance the colors so there is a little bit of "honey" in each quilt to make it interesting and fun.  I believe that in all we do we need to have a little bit of fun and a lot hard work.

The past few years, my whole focus has been on my family.  You might be able to tell from my blogging. Well, I had my caboose, my last little one, and I knew I wanted to cherish each moment.  For too long I tried to be it all, to do it all, and the last few years I have wanted to sit back and enjoy being a mother.  Well, to be honest, I have worked hard to be a mother.  It's work.  Having teenagers and toddlers together is in one word,  A CHALLENGE.

As my 4 year old starts wanting to have his own independence, I'm thinking I might be able to come back to this life again.  To share the things I am doing, to share tutorials, to be back in the world.  I hope to share some of my favorite recipes, my organizational tips, my quilty patterns, my rantings, and my fun.

I'm excited for you to join me.