Friday, December 16, 2011

Headband tutorials....just in time.

Here's a super easy headband tutorial, just in time for your friends and neighbors you love so much.  Last night, my sweet daughter needed some quick gifts for friends, so I whipped up 8 of these babies in about an hour.  That is my kind of gift.

Okay, it may take you longer than an hour (if you have never made one before), but not much.

Here's what you will need:

1 - 2 1/2"x 21" strip (this is the length of a fat quarter, or half width of fabric)
1 goody hair elastic (the thick ones)


1.  First cut your strip.  Clear a spot from your overflowing cutting area, and give yourself a small area to make a cut.  (Oh, you are more organized, and have a clean work space...congrats to you!)


2.  Cut the corners off...this is so the headband tapers down to your neck.  I cut off 1/2" on each side over 4 inches....does that make sense?  Look at the picture, you will understand better.


3.  See.....it is tapered.


4.  Fold the fabric over twice (a little less than 1/4"), and iron in place.  You may want to use a spray starch to keep it in place. 

BIG TIP...if you have a rolled hem foot use it.  I used it last night and all my dreams came true.  It was awesome.  


5.  Pin down your ironed edges....just to help yourself a little.


5.  Using a super small seam...sew the edges down.  


5.  Get ready to put your headband together...use the goody hair elastic.


6.  Fold your raw edge over first.  


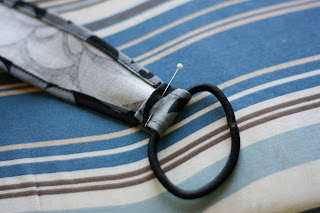
7.  Now, fold the folded edge over the elastic, and pin in place.  

****This is where you need to use your brain.  Check the size of your head.  How tight do you want this to be, how loose?  And adjust your folds accordingly.  The bigger the fold, the smaller the headband, etc.  For adults, I folded it over twice about 1/2", for children, maybe it was 1"  (as you can tell, I am super precise).


8. Do that to both sides.  And then sew in place.


9.  Clap and cheer, you are done, and you have  a super cute headband.


10.  Give it to a loved one, make them put it on ....then and there, and they will LOVE you for always and forever.


Thursday, December 15, 2011

Merry Christmas

Merry Christmas from our house to yours....have a beautiful Holiday!

Wednesday, December 14, 2011

WHCC


These are the Rep Card offered by WHCC.  A number of times I have been asked for my business card, but had nothing to offer.  So, finally, I put one together using photoshop.  I knew it had to be cute, and I wanted it to reflect my personality, as well as show some of my work.


This is the result.  I love it.  I printed these using the pearl finish, and I love the look of it.   I totally won't be embarrased to give these little babies out.


The cost?  $12.00 for 50.  I know it is a little steep, but I think it is reasonable for me.  Of course, if you are printing more, the cost is less per card.  If you are looking for a unique business card, or unique cards, wedding announcements and more, check out whcc.com.

Tuesday, December 13, 2011

Artisan Bread, wheat style

Today I made creamy chicken noodle soup for the teachers at my kids elementary school.  I made enough for our family tonight, but we definitely needed a starch to accompany it.  We are trying to be healthy, so I thought maybe grinding wheat and making 100% wheat artisan bread.

Grinding the wheat was fun, Noah hasn't seen me do that since he has been old enough to get excited about it.  He loved it, he kept wanting to watch those little wheat berries get ground to bits.  Then came the mixing of ingredients.....let's just say, this was a much less wet mixture than with white flour.


As you can see, Noah liked the mixing the ingredients too.   He really wanted to get as dirty as possible.  I tried to keep him out of the dough, but finally gave up, and just gave him a small portion of the dough to call his own.


And this is how they turned out.  The master recipe can be found here.  I used 12 cups wheat flour, and 1 cup regular white flour.  These loaves were a little more dense than usual, but they were still yummy!

Monday, December 12, 2011

Merry Christmas


My family has discovered Kid History.  This is episode 7, the Christmas Episode, and I had to share it with you.    If you like, check out the rest of the kid history's, they are hilarious.  We quote them quite often in our home, and they are a source of lots of funny joy.  


I hope your Christmas season is going well.  Things are moving along pretty well here.  I have been busy working on many Christmas cards for friends and friends of friends.  I am happy to say I just completed my last card.  The shopping is all done, and the gifts are all wrapped and under the tree. Do you think now I can go to the sewing room?  We can only hope.  I have tons of fun designs dancing in my head, waiting to come out.  Wish me luck.


Merry Christmas.

Tuesday, November 29, 2011

Digital Card Tutorial

Using digital cards is really fun and easy.  I have provided three free Christmas cards for you all to use as you will. There is a new one this year, Blessed.  Anyway, back to the tutorial.


Download here.


1.  Download the .png file from the website.  This is more than just copying it from my blog, you must download the file as a .png for it to work for you.


2.  Use a program that work with a .png file.  I use Photoshop, but PSE works too, as well as picasa and paint.


3.  The cards are like physical layers, imagine you are really scrapbooking.   Put your photos beneath the .png overlay.    You can change the order of your photos and the card by dragging the side bar (as shown in the illustration below).


4.  Once you have completed your cards, upload them to costco.com,  (upload them at the slower speed), and then print.


The internet is a great resource.  I have learned the majority of my photoshop skills from researching it on the internet.  If you have questions, play on google, be patient.  Ask friends, ask me, ask on internet forums, ....there are some great resources out there.

Good Luck and Merry Christmas.


I have changed this card to be blank where the year is.  You can simply use the type tool to add the year to the card.  I typed mine in white, an then changed the opacity a bit.


Tuesday, November 8, 2011

This time of year...

I always forget how incredibly busy November is.  For me, it almost feels busier than December.  How is that?    There are family pictures to take, christmas cards to make for our own familly, and Christmas cards to make for others.  There are neighbor gifts to plan, and make, and sweat over. 
Plus, for me, November is a crazy time for my calling (Stake Primary Music Leader).  A new year means new music, new training for the ward choristers, and going to all the wards Primary Programs in our stake.  So wonderful, and a little busy.  Luckily, we just finished making our Christmas gifts for all the wards, and my gifts for the music leaders are half finished.  Should I be sewing those now instead of writing on this blog?  
Don't understand what I am talking about: go to mormon.org

All this to say....this time of year is busy.  We are all preparing for the end of the year.  Closing out this year, and beginning new projects, giving gifts, and being grateful for all we have.  It's an awesome time of year isn't it?  Maybe you need a little ME time.  Perhaps you would like to immerse yourself in fabric, thread, and a new pattern?  If you aren't too busy doing all the crazy things that happen in November...maybe you can join me in a little ME time.

 ARE YOU TOO BUSY?  If you have a couple hours to spare, would you like to JOIN me?  I am lecturing and teaching a class for the Green Valley Quilters guild on Nov. 18 (lecture) and November 19 (class).  If you can join us, you TOTALLY should.  Here is the guilds website.  They meet at the American Legion building at 


1560 W. Duval Mine Rd., Green Valley, AZ

The class is at Friends in Deed
301 W. Camino Casa Verde


I will be teaching my Dripping Diamonds quilt starting at 9 a.m.  We are going to have a BLAST!   If you would like to take the class, please contact Green Valley Quilt Guild, and they can set you up.  See you soon.

Wednesday, November 2, 2011

Happy Halloween!!!


Here's hoping your Halloween was as awesome as Pooh Bears!

Now onto the ....Holidays.  I'm in the middle of working on gifts for friends, neighbors, church friends, family, and working on the second book.  I have no idea if the second book thing will happen, because life is well....FULL.  Happily, and awesomely.....FULL.

Full of JOY!


Thursday, October 20, 2011

Working hard....


This is what I am currently working on.  It's  quilt for my parents.  They commissioned me to make them a quilt for their  home (to cover an unsightly wall).

Full disclosure, this is the "teachers" quilt from a class I took at Quilt Fest.  Mine will look the same but different.

I love taking classes, I don't have to think about the pattern, and this class had the fabric all ready for us.  Pretty awesome.

As I am piecing this though, I keep wishing the whole thing was put together an easier way.  Some parts are stretching, and moving....argh.  But, I am a quilter, I can make it work!  Plus, this is fun to work with.  The colors are amazing, and I can already tell it is going to be perfect for my parents.

Wednesday, October 5, 2011

Hem those jeans

I found this fun and EASY way to hem levi's this summer at a family retreat.  I actually just overheard this way of hemming jeans, so I may do it a little different....and that is okay.

Step  1.  Measure - figure out where you want your jeans to fall.  You'll figure out how to measure once you read the whole tutorial.


Step 2:  Sew -   now sew along the folded edge....just like the picture below.


Step 3 - hey, do the other leg too...


Step 4 - this is how the inside of your pants should look.  YES, you could use matching thread, but I thought you might want to see the thread....also I am too lazy to change the bobbin thread.  


Step 5-   Now,  place the fold on the inside of the pant leg, so you can see the original hemmed pant leg.


Step 6 - tack the fold down.  I sewed along the seam edge just to the top of the fold.  Please, secure your stitches.


You are done!  Sew easy  (ha ha ha).  Seriously, I like this method because there is no cutting, nothing permanent, and it can be done in about 5 minutes.  That is my kind of project.  Happy Sewing.

Tuesday, October 4, 2011

Congratulations...the winner is....

Congrats to BEV from Mapleton, UT.  She is the winner of the new book....


Which project will she make first?

Monday, September 26, 2011

you can....SEW the PERFECT GIFT


It's a wonderful surprise to find a manila envelope on right outside your door.  It's an even better surprise to open it up and find a book with a few of your projects inside.  It's been so long since I have worked on this, that I almost forgot about it.  Phew.  Now, I am wondering where my projects are....but that is another story.


HELLO...this book is adorable.  I had no idea what to expect from this book.  We authors are all a little different in our styles, project preferences, etc....so I was excited to see how it all came together.  It came together perfectly.  It is so fun.  It's very rare that I look through a book and want to make all the projects.  They are all so super cute.


So, who wants to win one??????  Just enter your name, and where you are from for a chance to win!  I'll draw the winner next week.


Okay, here are my projects.  When I was making them, I so wanted to share what I was up to.  That is what is hard...I can't prepublish my stuff...but I totally want to.  Okay, so here is the pillow I designed....I had almost forgotten it.   Hello friend, I can't wait to see you again.


And below...that is my take on the "three trees,"  I can't help but be a little funky.  I absolutely loved how these turned out.  I loved making them, I loved it all!  So fun.


Okay, below are some of my favorites from the book.  This is a super cute bag pattern, and guess what I just bought at Quilt Fest?  Tons of fabric.  


This apron below is perfect.  Not too big, not too small, and I LOVE seriously LOVE the use of laminated fabric.  Man, I love that stuff.


Friday, September 23, 2011


Here I am, in Provo, Utah at the Annual Quilt festival for the Utah Quilt guild.  I have gotten in trouble a few times today for my lack of awesome blogging.  Oops.  At least there is always room to improve, right?


Today I met some blog readers, and that was a treat.  Sometimes, I feel like no one is really out there in blog land, and it is fun to hear readers stories.  The woman I met today, is around my age (probably younger, I am getting to a ripe old age).  She became acquainted with quilting by reading my blog, which she found from my friend Summer...(thanks Summer for directing people my way).  Now, she has started quilting, and brought friends along for the ride, and I feel so excited.  Excited, because the whole point of me writing a quilting book was to help others to LOVE quilting.  It sends warm fuzzies all over my little heart to know I have made a difference in at least one persons life.


Now, I am preparing to return to my sweet family (thank you Facetime for letting me see them each night).   I can't wait to see my perfect little babies and the fabulous love of my life.  Yet, I am sad to leave my home state, the wonderful FALL weather, and the inspiration which surrounds me at Quilt Fest.  


There is always next year....

Tuesday, September 20, 2011

ADORABLE!


Isn't that the cutest little guy you  have ever seen.  Yep, I am a little partial to my sweetheart of a baby.  But, oh my goodness, he is heart melting.  Yummy.    Okay, moving on.

What are these itty bitty tiny quilts?  They are little wall hangings I made for our church.  We are doing a service project for sweet little babies in other countries.  These babies are having a hard time developing the ability to see because they have no contrasting colors..staring at white walls all day.  

Here comes the little quilts.  So, to do our part to help these little ones, we are making little quilts for them to gaze at.  

My goal for this project: 1) get it done in a couple of hours, 2) make the quilts using lots of contrasting colors.  So, I sorted through my scraps, I used only left over quilt blocks from samples I have made, or blocks left over from big projects.  Get it done in a couple of hours.....CHECK.  This really was a fun project to do, it took so little time, but I still got to sew (I am missing that with my little joy ...shown in the pictures above and below), and I know it is for a good cause.

If you are looking for a small project to tackle, maybe you need to get your feet wet in this new hobby, consider sewing a little something for someone in need.  It will fill your bucket! 

 I promise.


Tuesday, August 9, 2011

Master chef....


Our kids have been watching Master Chef this summer.  They are absolutely adorable...they keep saying I should go on the show, and cook my best meals.  I know better.  I am no "master chef,"  I cook to stay alive.  Of course, if I am going to cook it better taste good, but I can't say that cooking is a passion of mine.


However, this summer has seriously cramped my creative style.  I have had very little time to do anything that could be described as creative.  Unless you call cleaning and entertaining children a creative outlet.  So, when my kids challenged me to be like the Master Chef's and make them eggs benedict, I did it.   The kids loved it, and it was good for me to try my hand at something new, and actually succeed.  


Want to try, here is the recipe.


Ingredients

  • 4 egg yolks
  • 3 1/2 teaspoons lemon juice
  • 1 pinch ground white pepper
  • 1/8 teaspoon Worcestershire sauce
  • 1 tablespoon water
  • 1 cup butter, melted
  • 1/4 teaspoon salt
  • 8 eggs
  • 1 teaspoon distilled white vinegar
  • 8 strips Canadian-style bacon
  • 4 English muffins, split
  • 2 tablespoons butter, softened

Directions

  1. To Make Hollandaise: Fill the bottom of a double boiler part-way with water. Make sure that water does not touch the top pan. Bring water to a gentle simmer. In the top of the double boiler, whisk together egg yolks, lemon juice, white pepper, Worcestershire sauce, and 1 tablespoon water.
  2. Add the melted butter to egg yolk mixture 1 or 2 tablespoons at a time while whisking yolks constantly. If hollandaise begins to get too thick, add a teaspoon or two of hot water. Continue whisking until all butter is incorporated. Whisk in salt, then remove from heat. Place a lid on pan to keep sauce warm.
  3. Preheat oven on broiler setting. To Poach Eggs: Fill a large saucepan with 3 inches of water. Bring water to a gentle simmer, then add vinegar. Carefully break eggs into simmering water, and allow to cook for 2 1/2 to 3 minutes. Yolks should still be soft in center. Remove eggs from water with a slotted spoon and set on a warm plate
  4. While eggs are poaching, brown the bacon in a medium skillet over medium-high heat and toast the English muffins on a baking sheet under the broiler.
  5. Spread toasted muffins with softened butter, and top each one with a slice of bacon, followed by one poached egg. Place 2 muffins on each plate and drizzle with hollandaise sauce. Sprinkle with chopped chives and serve immediately.

Monday, August 8, 2011

For the love of....

JAM


It's that season.  School season, oh yea, and summer too.  Long ago in my Michigan days I would go to the Upick strawberry patch and spend the day picking berries with my babies on my back.  Then I would go home, wash the berries, then take the stems off the berries, then make the jam.

It was a long process.  But the results were so great, I had to do it.  It was one of my favorite jobs as a mother.  Providing homemade jam has always been a "need" in our family, and I love that our kids appreciate the difference between real jam and store bought jam.

But, things are different now.  First, I live in the desert.  Second, my time for making jam has seriously eroded.  Who knew having 4 kids could completely eat up all free time?

What's the solution?  In true Sarah fashion, I make jam the easiest way possible.

Step 1- buy the bags of berries from Costco (frozen berries)
this time it was 2 bags of strawberry and 1 bag of mixed berries..
why? because strawberries are cheaper, but the mixed berries are fabulous

Step 2- Defrost the berries by sticking them on an outside table for an hour.  This may take longer if you live anywhere reasonable.

Step 3- Blend up the berries.  We used a handmixer in one big bowl.  It took about 5 minutes.  Maybe.

Step 4- Using the freezer jam pectin from ball (shown in picture above), make jam by mixing packet with 1 1/2 cups sugar and 4 cups of fruit.   Stir for 3 minutes and you are done.

No cooking!  Nothing could be simpler or better!  

Saving time never tasted so delicious!

Friday, July 1, 2011

Everyone Needs a Potholder


While in my hometown, I like to do a little quiltin'.  This time, my sister Brooke (pictured below in the brown), asked me to do a little class for her ward.    Who knew there would be over 20 people in this class?  Not me, but what a great surprise.  

We spent 2 hours learning about cutting, piecing, pressing, and quilting. A potholder is the perfect little quilt to learn all the steps in making a quilt.  

And, to get it all done in 2 hours is pretty great.

I was sincerely shocked and awed, in how well these women did.  Some of them had never ever machine quilted before, and yet still did some amazing machine quilting.  WOW.  

I have no idea how many of them will become addicted to this past time we all love, but I have a small hope that someone was introduced to their "great love."  Non-romantically, of course!