Here's a super easy headband tutorial, just in time for your friends and neighbors you love so much. Last night, my sweet daughter needed some quick gifts for friends, so I whipped up 8 of these babies in about an hour. That is my kind of gift.
Okay, it may take you longer than an hour (if you have never made one before), but not much.
Here's what you will need:
1 - 2 1/2"x 21" strip (this is the length of a fat quarter, or half width of fabric)
1 goody hair elastic (the thick ones)
1. First cut your strip. Clear a spot from your overflowing cutting area, and give yourself a small area to make a cut. (Oh, you are more organized, and have a clean work space...congrats to you!)
2. Cut the corners off...this is so the headband tapers down to your neck. I cut off 1/2" on each side over 4 inches....does that make sense? Look at the picture, you will understand better.
3. See.....it is tapered.
4. Fold the fabric over twice (a little less than 1/4"), and iron in place. You may want to use a spray starch to keep it in place.
BIG TIP...if you have a rolled hem foot use it. I used it last night and all my dreams came true. It was awesome.
5. Pin down your ironed edges....just to help yourself a little.
5. Using a super small seam...sew the edges down.
5. Get ready to put your headband together...use the goody hair elastic.
6. Fold your raw edge over first.
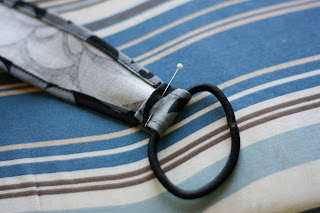
7. Now, fold the folded edge over the elastic, and pin in place.
****This is where you need to use your brain. Check the size of your head. How tight do you want this to be, how loose? And adjust your folds accordingly. The bigger the fold, the smaller the headband, etc. For adults, I folded it over twice about 1/2", for children, maybe it was 1" (as you can tell, I am super precise).
8. Do that to both sides. And then sew in place.
9. Clap and cheer, you are done, and you have a super cute headband.
10. Give it to a loved one, make them put it on ....then and there, and they will LOVE you for always and forever.


Darling! I will definitely be making these, maybe for Brenna's birthday party in January.
ReplyDeleteThose are really cute Sarah!! I made some for my little girl and for her friends this last year as birthday presents. I loved that I got to use up some of my scraps. I love the hair tie idea instead of using elastic.
ReplyDelete