Friday, December 16, 2011

Headband tutorials....just in time.

Here's a super easy headband tutorial, just in time for your friends and neighbors you love so much.  Last night, my sweet daughter needed some quick gifts for friends, so I whipped up 8 of these babies in about an hour.  That is my kind of gift.

Okay, it may take you longer than an hour (if you have never made one before), but not much.

Here's what you will need:

1 - 2 1/2"x 21" strip (this is the length of a fat quarter, or half width of fabric)
1 goody hair elastic (the thick ones)


1.  First cut your strip.  Clear a spot from your overflowing cutting area, and give yourself a small area to make a cut.  (Oh, you are more organized, and have a clean work space...congrats to you!)


2.  Cut the corners off...this is so the headband tapers down to your neck.  I cut off 1/2" on each side over 4 inches....does that make sense?  Look at the picture, you will understand better.


3.  See.....it is tapered.


4.  Fold the fabric over twice (a little less than 1/4"), and iron in place.  You may want to use a spray starch to keep it in place. 

BIG TIP...if you have a rolled hem foot use it.  I used it last night and all my dreams came true.  It was awesome.  


5.  Pin down your ironed edges....just to help yourself a little.


5.  Using a super small seam...sew the edges down.  


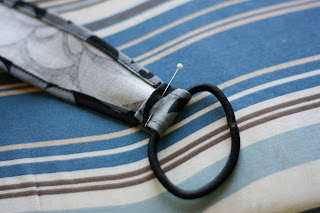
5.  Get ready to put your headband together...use the goody hair elastic.


6.  Fold your raw edge over first.  


7.  Now, fold the folded edge over the elastic, and pin in place.  

****This is where you need to use your brain.  Check the size of your head.  How tight do you want this to be, how loose?  And adjust your folds accordingly.  The bigger the fold, the smaller the headband, etc.  For adults, I folded it over twice about 1/2", for children, maybe it was 1"  (as you can tell, I am super precise).


8. Do that to both sides.  And then sew in place.


9.  Clap and cheer, you are done, and you have  a super cute headband.


10.  Give it to a loved one, make them put it on ....then and there, and they will LOVE you for always and forever.


Thursday, December 15, 2011

Merry Christmas

Merry Christmas from our house to yours....have a beautiful Holiday!

Wednesday, December 14, 2011

WHCC


These are the Rep Card offered by WHCC.  A number of times I have been asked for my business card, but had nothing to offer.  So, finally, I put one together using photoshop.  I knew it had to be cute, and I wanted it to reflect my personality, as well as show some of my work.


This is the result.  I love it.  I printed these using the pearl finish, and I love the look of it.   I totally won't be embarrased to give these little babies out.


The cost?  $12.00 for 50.  I know it is a little steep, but I think it is reasonable for me.  Of course, if you are printing more, the cost is less per card.  If you are looking for a unique business card, or unique cards, wedding announcements and more, check out whcc.com.

Tuesday, December 13, 2011

Artisan Bread, wheat style

Today I made creamy chicken noodle soup for the teachers at my kids elementary school.  I made enough for our family tonight, but we definitely needed a starch to accompany it.  We are trying to be healthy, so I thought maybe grinding wheat and making 100% wheat artisan bread.

Grinding the wheat was fun, Noah hasn't seen me do that since he has been old enough to get excited about it.  He loved it, he kept wanting to watch those little wheat berries get ground to bits.  Then came the mixing of ingredients.....let's just say, this was a much less wet mixture than with white flour.


As you can see, Noah liked the mixing the ingredients too.   He really wanted to get as dirty as possible.  I tried to keep him out of the dough, but finally gave up, and just gave him a small portion of the dough to call his own.


And this is how they turned out.  The master recipe can be found here.  I used 12 cups wheat flour, and 1 cup regular white flour.  These loaves were a little more dense than usual, but they were still yummy!

Monday, December 12, 2011

Merry Christmas


My family has discovered Kid History.  This is episode 7, the Christmas Episode, and I had to share it with you.    If you like, check out the rest of the kid history's, they are hilarious.  We quote them quite often in our home, and they are a source of lots of funny joy.  


I hope your Christmas season is going well.  Things are moving along pretty well here.  I have been busy working on many Christmas cards for friends and friends of friends.  I am happy to say I just completed my last card.  The shopping is all done, and the gifts are all wrapped and under the tree. Do you think now I can go to the sewing room?  We can only hope.  I have tons of fun designs dancing in my head, waiting to come out.  Wish me luck.


Merry Christmas.